Getting Started
- Enabling Speedy Pixels in your Shopify Theme
Customize your current theme by navigating to Online Store > Themes > Customize in your Shopify Admin.
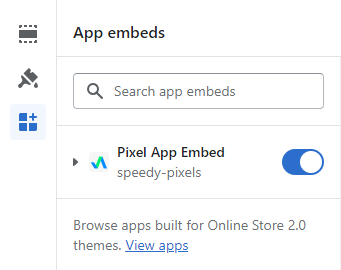
Click the App embeds icon in the sidebar and toggle the switch on, as shown in the image below. Our system may take a moment to recognize that you have enabled our app.
- Setting up your pixels
When creating a pixel, you have the option to choose from multiple starting templates, such as Google Analytics. This is the easiest way to get started, until you feel comfortable branching out to implementing custom pixels. Once creating a pixel from a template, you simply need to replace YOUR_PIXEL_ID in the content section with the ID specific to your account. For example, in Google Analytics, you can find this under your property's tracking code section in your Google Analytics account.
- What is a global variable?
Though not necessary, many third party pixels add a global variable to the window , so that you can send events to the pixel. For example, in Google Analytics you may send an event to the pixel like so:
dataLayer.push({'event': 'event_name'});
However, our pixels are run in web workers, meaning that they do not have access to window variables by default. This means that the variable must be forwarded to the web worker. In this example, you would do so by adding dataLayer.push to the pixel variable; however, for other pixels, this window variable would certainly be called something different.
- Connecting your pixel
Once your pixel has been created, you will be able to connect the pixel to your website with the click of a button. However, before connecting, you will need to remove any instances of that pixel in your theme to avoid duplicate data reporting. Speedy Pixels does not disable any of your existing pixels or code. But once connected, the pixel will immediately start running, and you will start seeing the performance benefits of Speedy Pixels.
- Convert an HTML pixel to Javascript
Pixels saved in our system are run on your website using a Javascript web worker. This means that pixel content cannot accept HTML. The most common pixel is Google Analytics, so we'll use this an example in this guide.
Here's a sample of the Google Analytics pixel. Although, the Google Analytics template can be chosen when creating a pixel, let's see how this HTML can be converted to Javascript.
<!-- Global site tag (gtag.js) - Google Analytics -->
<script async src="https://www.googletagmanager.com/gtag/js?id=YOUR_PIXEL_ID"></script>
<script>
window.dataLayer = window.dataLayer || [];
function gtag(){dataLayer.push(arguments);}
gtag('js', new Date());
gtag('config', 'YOUR_PIXEL_ID');
</script>
Converted to Javascript, the pixel looks like this:
const script = document.createElement('script');
script.setAttribute('src', 'https://www.googletagmanager.com/gtag/js?id=YOUR_PIXEL_ID');
script.setAttribute('async', '');
document.head.appendChild(script);
window.dataLayer = window.dataLayer || [];
function gtag(){dataLayer.push(arguments);}
gtag('js', new Date());
gtag('config', 'YOUR_PIXEL_ID');
What's the difference? For one the <script> tags are removed, as the entire pixel content will be run as Javascript.
<script async src="https://www.googletagmanager.com/gtag/js?id=YOUR_PIXEL_ID"></script>
Then, most importantly, this tag was replaced with:
const script = document.createElement('script');
script.setAttribute('src', 'https://www.googletagmanager.com/gtag/js?id=YOUR_PIXEL_ID');
script.setAttribute('async', '');
document.head.appendChild(script);
First, the tag will be created using document.createElement . Then, if you look closely, you'll see that all the attributes on the script tag were added using script.setAttribute . Finally, this script tag is added to the DOM with document.head.appendChild .